Japanese Katsu Bowls: A Delicious Guide to Making Authentic Katsu at Home
If you’re looking for a dish that brings warmth and comfort to the table, you’ve found it! Japanese Katsu Bowls: A Delicious Guide to Making Authentic Katsu at Home is a delightful recipe that transforms simple ingredients into a crispy, golden-brown masterpiece. This dish is perfect for busy weeknights when you want something satisfying yet easy to prepare. Whether you’re cooking for family or entertaining friends, this Chicken Katsu is sure to impress everyone with its irresistible flavor.
What makes this recipe even more special is how customizable it is. You can enjoy it as a quick meal or serve it for special occasions. Trust me, once you try this dish, it will become a staple in your home!
Why You’ll Love This Recipe
- Easy preparation: This recipe comes together quickly, making it perfect for any night of the week.
- Family-friendly appeal: Kids and adults alike will love the crispy texture and delicious flavors.
- Make-ahead convenience: Prepare the katsu and rice in advance for an even easier meal later on.
- Versatile ingredients: The ingredients are simple and can be easily swapped based on what you have on hand.
Ingredients You’ll Need
Gathering these ingredients is part of the fun! They are simple, wholesome, and readily available at most grocery stores. Let’s take a look at what you’ll need to create your own delicious Japanese Katsu Bowls.
For the Chicken Katsu
- 2 boneless chicken breasts (or beef loin, if preferred)
- Salt and pepper, to taste
- 1 cup all-purpose flour
- 2 large eggs
- 1 cup panko breadcrumbs
- Vegetable oil, for frying
For the Rice
- 2 cups Japanese short-grain rice
- 2 ½ cups water
- 1 tablespoon rice vinegar
- 1 tablespoon sugar
- ½ teaspoon salt
For the Sauce and Garnishes
- ¼ cup tonkatsu sauce (or store-bought if you prefer)
- 1 tablespoon soy sauce
- 1 teaspoon Worcestershire sauce
- 1 teaspoon ketchup
- 1 cup shredded cabbage
- 2 green onions, sliced
- Sesame seeds, for garnish
- Pickled ginger (optional)
Variations
One of the best things about this recipe is its flexibility! Here are some fun variations to keep things exciting:
- Swap the protein: Try using beef loin or even tofu for a vegetarian twist!
- Add some spice: Mix in some chili flakes or sriracha into your sauce for a little heat.
- Experiment with toppings: Top your katsu with avocado slices or pickled vegetables for added flavor.
- Change up the sides: Serve with miso soup or steamed veggies for a complete meal.
How to Make Japanese Katsu Bowls: A Delicious Guide to Making Authentic Katsu at Home
Step 1: Rinse the Rice
Start by rinsing the rice under cold water until the water runs clear. This step removes excess starch and ensures fluffy rice. It’s important because no one wants sticky rice in their katsu bowl!
Step 2: Soak the Rice
Transfer the rinsed rice to a saucepan, add water, and soak for 30 minutes. Soaking helps achieve that perfect texture when cooked.
Step 3: Cook the Rice
Cover the saucepan and bring it to a boil. Once boiling, reduce heat and simmer for 15 minutes without lifting the lid. Letting it cook undisturbed allows all those lovely flavors to meld together.
Step 4: Let It Rest
After cooking, turn off the heat and let the rice sit covered for another 10 minutes. This resting period is crucial as it allows steam to finish cooking the rice gently.
Step 5: Season the Rice
Mix rice vinegar, sugar, and salt in a bowl until dissolved. Gently fold this mixture into your cooked rice. This adds that signature tanginess that complements your katsu perfectly.
Step 6: Prepare the Chicken
Pound chicken breasts to an even thickness of about ½ inch and season them with salt and pepper. Even thickness ensures that they cook evenly—no one likes dry chicken!
Step 7: Set Up Your Breading Station
Create a breading station with flour, beaten eggs, and panko breadcrumbs laid out in order. This organized setup will keep things tidy as you coat your chicken.
Step 8: Bread Your Chicken
Dredge each piece of chicken in flour first, dip into eggs next, then coat generously with panko breadcrumbs. Each layer adds crunch that makes every bite satisfying!
Step 9: Fry Until Golden Brown
Heat vegetable oil in a skillet over medium heat. Fry each piece of chicken for about 4-5 minutes on each side until golden brown and cooked through. The sizzling sound means it’s working its magic!
Step 10: Drain and Rest
Once cooked, drain on paper towels to remove excess oil. Letting them rest before slicing keeps them juicy inside.
Step 11: Make Your Sauce
In a bowl, combine tonkatsu sauce, soy sauce, Worcestershire sauce, and ketchup. Mixing these together creates a rich sauce that ties everything together beautifully.
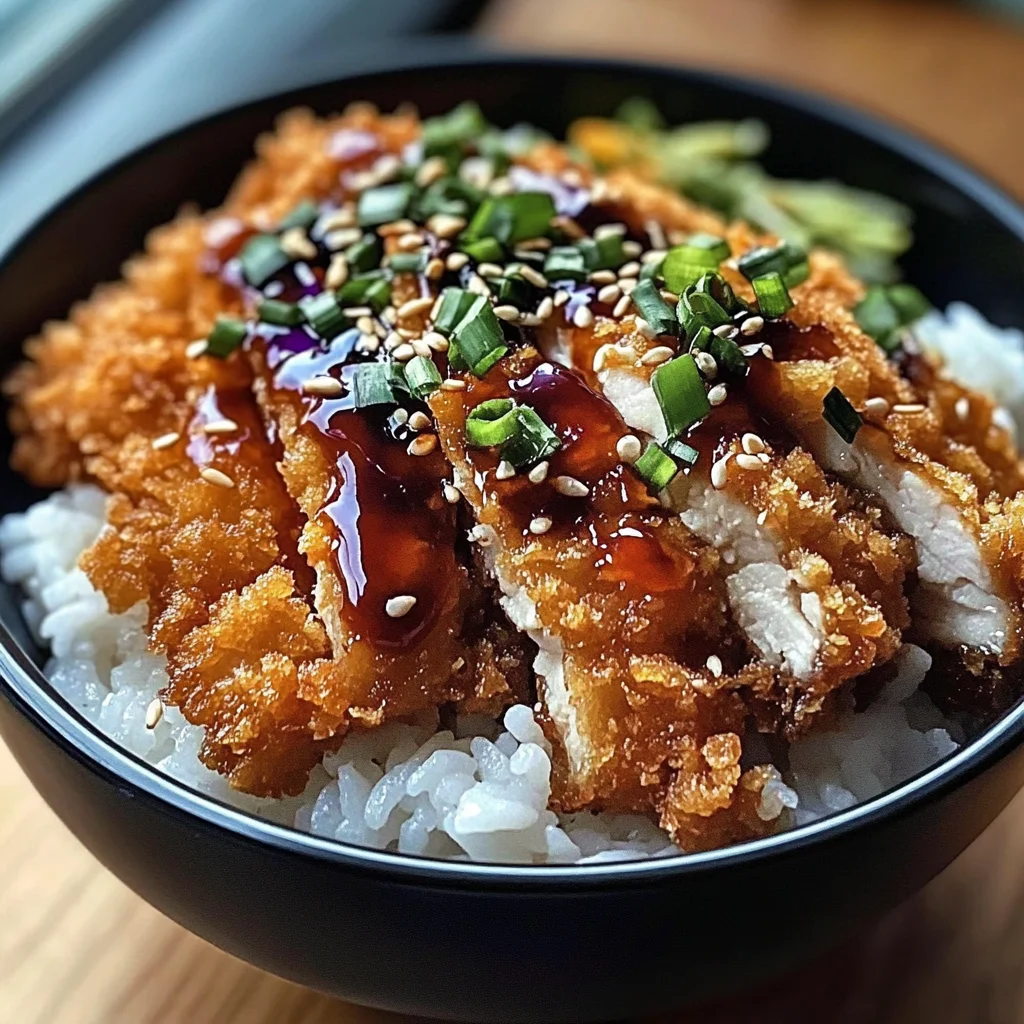
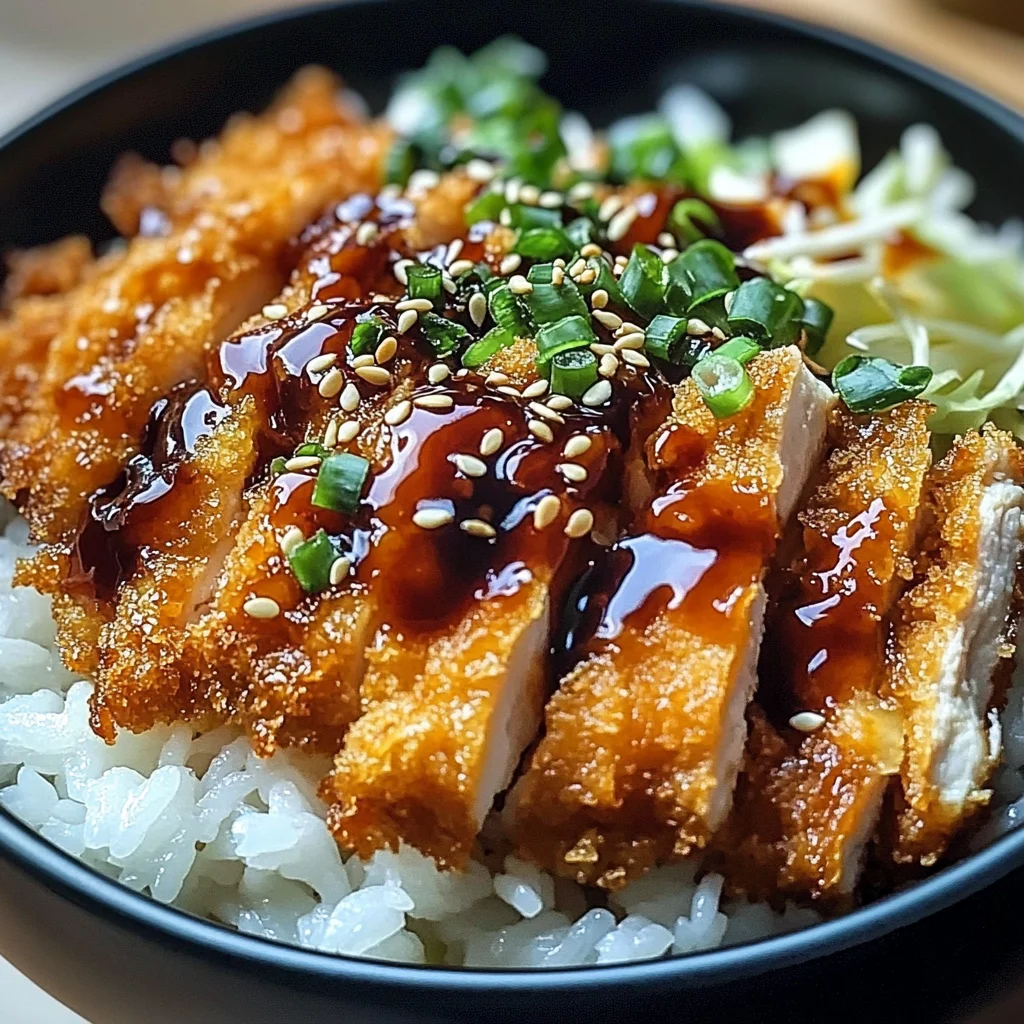
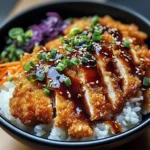
Step 12: Assemble Your Bowl
Serve warm rice on plates topped with sliced katsu, shredded cabbage, green onions, and sesame seeds. Drizzle with your homemade sauce and add pickled ginger if desired—this finishing touch elevates your dish!
Enjoy creating these delicious Japanese Katsu Bowls at home! They’re not just meals; they’re moments spent enjoying good food with loved ones around the table!
Pro Tips for Making Japanese Katsu Bowls: A Delicious Guide to Making Authentic Katsu at Home
Creating the perfect katsu bowl at home may seem daunting, but with a few handy tips, you can elevate your cooking game and impress everyone at the table!
-
Use high-quality chicken or beef: Selecting fresh, high-quality meat ensures that your katsu is tender and delicious. It makes a noticeable difference in flavor and texture.
-
Pound the meat evenly: By pounding the chicken or beef to an even thickness, you ensure that it cooks uniformly. This helps prevent any dry spots while ensuring a perfectly crispy coating.
-
Don’t skip soaking the rice: Soaking the rice before cooking removes excess starch, resulting in fluffier grains. This step is crucial for achieving that perfect Japanese-style sticky rice.
-
Control the oil temperature: Keeping the oil at the right temperature (around 350°F or 175°C) is key for a crispy exterior. If it’s too hot, the katsu will burn; if it’s too cold, it will absorb too much oil and become greasy.
-
Rest before slicing: Allowing the fried katsu to rest for a few minutes before slicing helps retain its juices. Slicing too soon can lead to dry meat and less enjoyable bites.
How to Serve Japanese Katsu Bowls: A Delicious Guide to Making Authentic Katsu at Home
Presentation is just as important as taste when it comes to serving your homemade katsu bowls! A beautifully arranged dish not only looks appealing but also enhances the overall dining experience.
Garnishes
- Sesame seeds: Sprinkle toasted sesame seeds on top of your katsu for added crunch and nutty flavor.
- Pickled ginger: This tangy addition complements the richness of katsu and adds a refreshing contrast.
- Chopped cilantro or parsley: Fresh herbs can brighten up your plate visually and add an aromatic touch.
Side Dishes
- Miso Soup: A warm bowl of miso soup pairs perfectly with katsu. The savory broth balances out the richness of the fried chicken or beef.
- Edamame: These lightly salted young soybeans are a nutritious side that adds color and texture to your meal.
- Japanese Pickles (Tsukemono): These tangy pickled vegetables provide a delightful crunch and balance out flavors on your palate.
- Steamed Broccoli or Asparagus: Lightly steamed greens add a healthy element to your meal while offering vibrant color and nutrition.
Enjoy crafting your Japanese Katsu Bowls! With these tips, garnishes, and side dishes in mind, you’ll have everything you need for a memorable meal that captures the spirit of authentic Japanese cuisine right in your own kitchen.
Make Ahead and Storage
This Chicken Katsu recipe is perfect for meal prep, allowing you to enjoy delicious servings throughout the week. Here are some practical tips to store and enjoy your katsu bowls even after cooking.
Storing Leftovers
- Allow the chicken katsu to cool completely before storing.
- Place the chicken in an airtight container and refrigerate for up to 3 days.
- Store the rice separately in a sealed container to maintain its texture.
Freezing
- After cooking, let the chicken katsu cool down.
- Wrap each piece tightly in plastic wrap or aluminum foil, then place them in a freezer-safe bag.
- Freeze for up to 3 months. For best results, label with the date.
Reheating
- To reheat, remove any wrapping from the chicken and place it on a baking sheet.
- Preheat your oven to 375°F (190°C) and bake for about 10-15 minutes until heated through and crispy.
- Alternatively, reheat rice in the microwave with a splash of water for moisture, covering it with a damp paper towel.
FAQs
Here are some common questions about making Japanese Katsu Bowls: A Delicious Guide to Making Authentic Katsu at Home.
Can I use different types of meat for Japanese Katsu Bowls?
Absolutely! While chicken is traditional, you can also use beef loin or even tofu for a vegetarian option. Just ensure you adjust cooking times as needed.
What is the best way to serve Japanese Katsu Bowls?
For the best presentation, serve your Chicken Katsu over seasoned rice and top it with shredded cabbage, green onions, and a drizzle of tonkatsu sauce. Add sesame seeds for extra crunch!
Can I make Japanese Katsu Bowls ahead of time?
Yes! This recipe is great for meal prep. You can prepare the chicken katsu and rice in advance, store them properly, and reheat when ready to enjoy.
What sides go well with Japanese Katsu Bowls?
You can pair your katsu bowls with various sides such as miso soup, pickled vegetables, or steamed edamame for a complete meal.
How do I achieve extra crispy Chicken Katsu?
To get that perfect crunch, ensure that you’re using panko breadcrumbs and frying at the right temperature. Too low heat can result in soggy katsu!
Final Thoughts
I hope you find joy in making this Chicken Katsu recipe at home. It’s not just about enjoying delicious food; it’s about creating warm memories around your dining table. Whether you’re serving it on a busy weeknight or sharing it with friends over the weekend, this dish promises smiles all around. Enjoy every bite and don’t forget to share your experience!
Japanese Katsu Bowls: A Delicious Guide to Making Authentic Katsu at Home
Experience the warmth and comfort of homemade Japanese Katsu Bowls, a delightful dish that transforms simple ingredients into a crispy, golden-brown masterpiece. This easy chicken katsu recipe is perfect for busy weeknights or special occasions, making it a family favorite that everyone will love. The versatility of this recipe allows you to customize flavors and ingredients based on what you have on hand. With its irresistible crunch and savory sauce, your dining table will be filled with smiles and satisfied appetites.
- Prep Time: 20 minutes
- Cook Time: 30 minutes
- Total Time: 50 minutes
- Yield: Serves 4
- Category: Main
- Method: Frying
- Cuisine: Japanese
Ingredients
- 2 boneless chicken breasts (or beef loin)
- 1 cup all-purpose flour
- 2 large eggs
- 1 cup panko breadcrumbs
- Vegetable oil for frying
- 2 cups Japanese short-grain rice
- ¼ cup tonkatsu sauce
- 1 tablespoon soy sauce
- 1 cup shredded cabbage
- 2 green onions, sliced
- Sesame seeds for garnish
Instructions
- Rinse rice under cold water until clear; soak in water for 30 minutes.
- Cook rice: Bring to boil in a saucepan, reduce heat to simmer for 15 minutes without lifting the lid, then let sit covered for 10 minutes.
- Season rice with a mixture of vinegar, sugar, and salt.
- Pound chicken to even thickness; season with salt and pepper.
- Set up a breading station: flour, beaten eggs, and panko breadcrumbs.
- Dredge chicken in flour, dip in eggs, then coat with panko.
- Heat oil in skillet over medium heat; fry chicken for 4-5 minutes per side until golden brown.
- Drain excess oil on paper towels; slice after resting briefly.
- Assemble bowls with rice topped with katsu, garnished with cabbage, green onions, sesame seeds, and drizzle with tonkatsu sauce.
Nutrition
- Serving Size: 1 bowl (325g)
- Calories: 550
- Sugar: 4g
- Sodium: 800mg
- Fat: 24g
- Saturated Fat: 3g
- Unsaturated Fat: 19g
- Trans Fat: 0g
- Carbohydrates: 65g
- Fiber: 2g
- Protein: 26g
- Cholesterol: 105mg